Whether you are a student trying hard to stay awake at 3 AM or a job holder starting your Monday morning, espresso is probably one of your most loyal friends. But it isn’t always possible to run down to your favorite coffee shop and grab your regular cup.
Let’s be honest, not all of us can afford to have luxurious coffee makers lying around our houses- but we refuse to let that stop us from having an a-grade cup of coffee at home. Fear not espresso lovers, because you are going to learn how to make espresso without an espresso machine.
A Little Talk About Espresso
Simply put, espresso is just really strong coffee. It’s made with finely ground coffee beans. This highly concentrated coffee beverage has a high coffee-to-water ratio, which gives it the signature intense (aka ‘bitter’) flavor.
The pressure applied to force hot water through neatly packed ground beans produces a thick layer of foam on the surface, which is known as ‘crema’.
This layer of foam differs in thickness and creaminess based on various factors, such as the machine used, the pressure applied, the temperature of the water, the fineness & amount of ground bean, etc.
So, if you can push warm water through an abundance of ground beans in a quick period, you get a coffee beverage as close to espresso as possible.
Usually, crema is the hardest to achieve with alternative brewing methods instead of an espresso machine. But we are going to try and learn methods that produce an espresso experience as close to perfect as can be done without having to use an actual espresso machine.
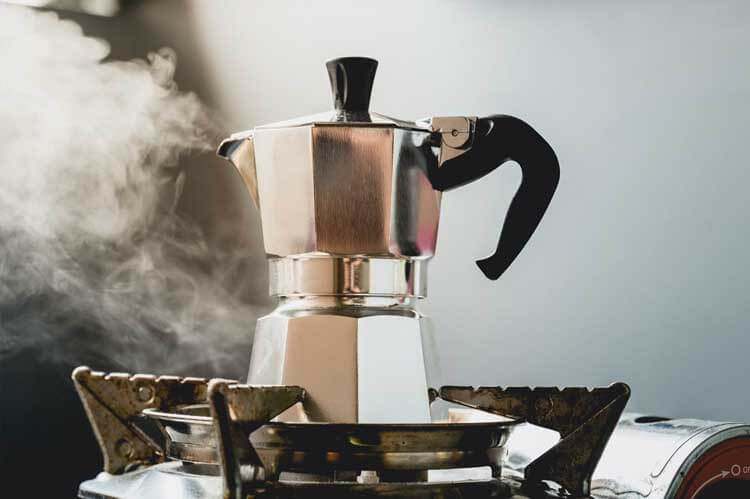
Method 1: Moka Pot/Stovetop Method
Moka pot is a European stovetop espresso maker. As it doesn’t produce the signature crema, some say it doesn’t make ‘true’ espresso. However, since this is a very common and affordable way to make espresso-like coffee beverages, this method is one of our top picks to learn today.

Moka is a stainless-steel pot that has 3 chambers- the base/boiler which holds water, the funnel-shaped middle chamber that detains the coffee ground, and the top chamber that collects the brewed coffee.
The pressure is created in the bottom chamber by steam generated by the heat of the stove. This will consequently pass the water through the ground coffee bean in the middle chamber, and produce a fully extracted flavorful coffee brew in the top chamber.
Since it’s a stove-top mechanism and can be difficult to handle, over-extraction is the most common occurrence and our biggest worry. But with practice and patience, this can easily be avoided. We are here to teach you step by step for your very first try.
What You Require
- Coffee/espresso beans
- Moka pot
- Coffee grinder
- Drinkable water
- Source of fire/stovetop
Step 1: Grind Your Coffee Beans and Fill Your Filter Basket
As stated before, to make espresso, we need to grind our coffee beans as fine as possible. Aim for an even powder-like ground. You need to put coffee grounds in the filter basket. Tap or shake it gently to settle the grounds evenly.
You can also even out the surface using fingers, but be careful not to press too hard. If the grounds are packed too tightly, steamed water will not be able to pass through them properly.
Step 2: Fill the Boiler
Pour water into the bottom chamber(boiler). You can use pre-heated or room-temperature water. Use fresh water and leave some space. Don’t fill the container all the way.
If the built-up pressure can’t be evacuated through the valve due to overfilling, your Moka pot may explode and cause an accident. It is recommended to fill the container halfway.
Step 3: Assemble and Boil
Screw the top spout with the bottom chamber. Follow specific product guide instructions on how to assemble your Moka pot if necessary to avoid mishaps. Place the pot on the stovetop on medium to medium-high heat.
If the heat is too low, pressure won’t be created and coffee will barely spew out the spout. And if it is too high, the coffee will come out of the spout too quickly and will not be extracted properly.
As per the Moka pot’s mechanism, when the water in the boiler reaches a boil, the built-up pressure will push the coffee out of the valve gradually. At this stage, you can hear a low puffing/humming sound and notice a rich stream getting progressively darker in color.
Once the stream turns to a honey-like color, remove your pot from the heat and close the lid.
Step 4: Pour and Clean
Simply pour your freshly brewed coffee and enjoy. If your coffee is too strong, you can dilute it with hot water.
Since a Moka pot is a steel (although stainless) product, it needs some care if you want it to last. Simply disassemble your Moka pot and wash it with warm soapy water. Dry thoroughly with a soft cloth or leave to air dry during good weather.
Method 2: AeroPress Method
AeroPress is a simple machine consisting of a cylinder, a plunger, and a filter. It’s renowned and loved widely for its lightweight and portable characteristics. The AeroPress machine doesn’t need any electricity to run, has no hassle of pumps and presses, and is also easy on your wallet.

What We Need
- AeroPress
- Coffee grinder
- Filter papers
- Water
- Coffee/espresso beans
Step 1: Grind Your Coffee Beans
Just like most other methods out there, using the AeroPress method also needs finely ground coffee. Ground your beans to a powder or table salt-like texture. Make sure all your beans are evenly grounded.
Step 2: Prepare Your AeroPress
Place a filter into the lower basket before you start to brew. Pour a little hot water through the filter to warm it up and get rid of the paper flavor or smell. Throw the rinse water out.
Now, place your basket in the bottom chamber. Place your freshly ground coffee beans. Tap/shake the tube gently to set the grounds evenly. Place an extra filter on top of the grounded coffee beans. Wet it with some warm water.
Step 3: First Plunge
Press the plunger all the way down to the bottom and then bring it back up. You should have coffee ground that looks similar to the puck.
Step 4: Add Hot Water and Plunge Again
Add hot water to your cylinder. Press the plunger slowly once again. Plunging gently with a moderate amount of force will get the job done. There is no steeping, brewing, or extra boiling time needed. Simply collect your freshly brewed espresso and enjoy.
Related article: How to Make Hot Chocolate with an Espresso Machine
Method 3: The French Press
The French press is a pretty common coffee material. Even if you don’t have one at home, purchasing one isn’t troublesome since it is priced in quite an affordable range. It’s a thermos-sized beaker with a piston. This piston runs through the lid of the machine to the middle of its beaker.

If prepared correctly, a French press will give you a concentrated espresso-like brew. However, there are a few extra steps. This method might take a little more time than our other hacks mentioned. Read along for the step-by-step guide.
What We Need
- French press coffee maker
- Coffee beans
- Coffee grinder
- Water
Step 1: Grind Your Coffee Bean
We have mentioned a few times with importance that espresso requires extremely finely ground coffee beans. However, the scenario is going to change while you are using the French press method.
The piston of this press can’t hold fine ground beans down, hence the coffee will most probably end up being mud-like and way bitter than usual espresso.
So, be mindful to keep your coffee beans to a coarse grind, as you normally would for a French press brewing. This will help your coffee to steep long enough to make a strong brew.
Step 2: Boil the Water and Prep Your French Press
Boil some drinking water. As the water starts to boil, swirl some warm water into the container of your press machine. This will help to avoid any cracks due to the sudden temperature change when you pour the boiling water in.
Make sure that the water has been boiling for some time when you start to brew your coffee. If the water isn’t hot enough, your coffee grind will not be extracted properly, which will result in a mixture that tastes like tepid water with a coffee hint.
Step 3: Pour, Stir, Steep
Pour boiling water into the container slowly. Start stirring gently. This will help prevent any clumps. Start steeping your brew slowly, but don’t take too long (you’ll understand why in the next few steps).
Step 4: Plunge & Pour
Once your brew is ready, hold the lid to keep the machine steady. Gently plunge in a slow, even motion until it reaches the bottom. This step may take some time and muscle work. Pour your coffee through a filter to prevent any fine dregs.
Step 5: Repeat Steps 3 & 4
Take the coffee you just brewed, and repeat steps 3 & 4 right away while it is still hot. Depending on how strong you want your coffee to be, increase or decrease the steeping time. This is called double brewing.
Alternative
If double brewed coffee is too strong for you, you can simply skip step 5. Instead, take time in step 3 while you are steeping and plunging. The longer you steep, the stronger your brew will be. But make sure not to over-extract your coffee, which will leave a sour taste in your mouth.
Conclusion
Now that we have discussed more affordable and easily attainable ways of how to make espresso without an espresso machine, we believe you don’t have to spend a lot of money on store-bought coffee or a fancy espresso maker.
So, go ahead, try these methods out if you have any of these alternative machines at your house; or invest in the one you liked best after reading this article.